Reboot a PC into “Last Known Good Configuration”
Rebooting a PC into “Last Known Good Configuration” mode forces a computer to use a saved version of the Windows registry that was in place the last time that computer successfully booted. This should fix all registry-related boot errors, assuming the last registry backup is available and is good condition.
Here are the steps to restore a PC to a previous state:
1.Restart the computer
2.Wait for the BIOS to complete POST (the screen with manufacturer logo and/or system information)
3.Quickly begin tapping F8 repeatedly, until the list of boot options is displayed
4.Choose “Last Known Good Configuration (Advanced)”
5.Press Enter and wait for the PC to boot.
Here is an example of the Windows Advanced Boot options menu, with the “Last Known Good Configuration” option selected:
Fix2:
Check the disk file system with CHKDSK utility
Since the error is often caused by a corrupt registry, checking and fixing the Windows file system with CHKDSK might be a good solution.
Here are the steps to run CHKDSK using the Windows XP Recovery Console:
1.Insert the Windows XP installation CD
2.Restart the computer and boot from the CD
3.Press any key to boot from the CD
4.Press R when the Windows Options menu is loaded to access Repair Console
5.Enter the Administrator password
6.When the Command Prompt appears, type the following command:
chkdsk C: /r
where C: (without a trailing slash: /) is letter of the Windows installation drive (it’s usually C:)
7.Press Enter
8.Remove the CD and type exit:
exit
9.Press Enter
10.Restart the PC
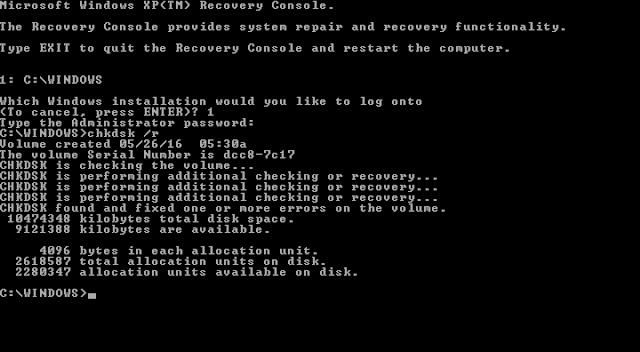
Here is what the PC’s console output should look like after chkdsk is done checking and fixing the drive file system:
Fix3:
Boot เข้า Windows ไม่ได้ขึ้น Windows could not start……
เกิดจากไฟล์ของระบบได้เกิดการสูญหายหรือสูญเสีย ทำให้ไม่สามารถ Boot เข้า Windows ได้ สาเหตุอาจเกิดจากการปิดสวิสไฟก่อนเครื่องคอมพิวเตอร์ดับ หรือมีการกดปุ่ม Shutdows กะทันหัน
“Windows could not start because the following file is missing or corrupt: \WINDOWS\SYSTEM32\CONFIG\SYSTEM”
You can attempt to repair this file by starting windows setup using the original setup CD-ROM select ‘r’ at the first screen to start repair
แก้ไข
1.กดปุ่ม Delete หรือ F2 ขึ้นอยู่กับรุ่นของไบออส เพื่อทำการ Boot แผ่น CD สำหรับเครื่องที่ตั้งค่าไว้แล้วสามารถข้ามขั้นตอนนี้ไปได้เลย
2.หลังจากนั้นเข้าไปที่หน้า Setup windows ทำการเลือก Repair windows โดยกด R เพื่อทำการซ่อมแซม Windows
3. จากนั้นจะปรากฏหน้าจอ Command prompt Recovery Console ให้ระบุหมายเลขของระบบปฎิบัติการที่ต้องการจะทำในเครื่องนั้น (ในที่นี้กด 1 แล้ว Enter)
4. จากนั้นจะแสดงข้อความให้กรอก Administrator password เราอไม่ได้ตั้งเอาไว้ก็ไม่เป็นไรข้ามไปเลยแต่ถ้ามีก็ใส่ลงไป
5. และพิมพ์ข้อความข้างล่างทีละบรรทัด
md tmp
copy c:\windows\system32\config\system c:\windows\tmp\system.bak
copy c:\windows\system32\config\software c:\windows\tmp\software.bak
copy c:\windows\system32\config\sam c:\windows\tmp\sam.bak
copy c:\windows\system32\config\security c:\windows\tmp\security.bak
copy c:\windows\system32\config\default c:\windows\tmp\default.bak
delete c:\windows\system32\config\system
delete c:\windows\system32\config\software
delete c:\windows\system32\config\sam
delete c:\windows\system32\config\security
delete c:\windows\system32\config\default
copy c:\windows\repair\system c:\windows\system32\config\system
copy c:\windows\repair\software c:\windows\system32\config\software
copy c:\windows\repair\sam c:\windows\system32\config\sam
copy c:\windows\repair\security c:\windows\system32\config\security
copy c:\windows\repair\default c:\windows\system32\config\default
6. จากนั้น พิมพ์ Exit และทำการ Restart
7. หากยังเปิด Windows ไม่ได้ ให้ถอด HDD เปิดเครื่องอื่นเพื่อทำการสำรองข้อมูล แล้วทำการลง Windows ใหม่


